Over the past few months, I have been attempting to find a way to increase the 'crop' and different ideas for planting different veggies/fruits for the garden. I didn't want to do too much in the front yard, but this was the only place that was now available after using all the space in the backyard (which wasn't much to begin with).
So, I started to try to think of different ways that we could make use of the front yard to make it functional but also maintain a nice look and not a junkie look.
Recently I purchased a Granny Smith apple tree, a Niagara Grape Vine, a Concord Grape Vine, and a batch of 50 strawberry plants. All of these will be delivered in the end of March to beginning of April.
So how would we put all of this together? Well, putting up a grape trellis and making some strawberry pyramids!
The next question I had was – how to make a grape trellis. I went to the local Menards and started looking at them; and found many different styles. Unfortunately, they were all too small and had a price tag of $75 or more. I opted to make a grape trellis to give me exactly what I was looking for.
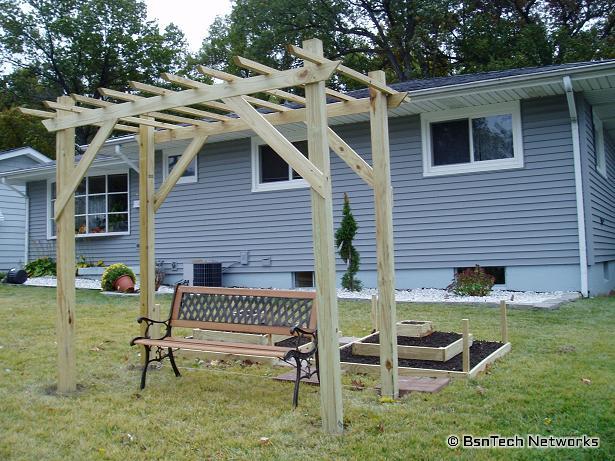
What I have made has a bit of 'style' to it, but it is also functional in the fact that it will support the two grape vines. The size of the trellis between the posts is 3' x 7', but the actual available space at the top is 5' x 8'. The top pieces extend out over the sides of the posts to make it look more fancy instead of just a generic look. I also cut all the pieces to have 45-degree angles pointing up.
Here are the materials I used. It cost me about $70 to make a trellis that was at least 3 times the size of the least expensive one at Menards – for cheaper.
- 4 – 4"x4"x8' treated posts
- 4 – 1"x4"x8' treated boards (go across the front and back and creates the diagnol pieces)
- 9 – 2"x2"x8' treated boards (pieces across the top)
The 4"x4"x8' posts were put about 1.5 feet down into the ground to give a total head clearance of 6 feet at the top point (this is because the 1"x4" pieces are dropped 6" below the top of the posts that connect the posts together). I then cut two of the 1"x4"x8' pieces down to 7 feet and used a saw to cut a 45-degree angle on both sides. The cross-braces (4 total) were made out of the 1"x4" pieces and were cut to 3 feet then a 45-degree angle cut out of each. Lastly, the 2"x2"x8' boards were cut to 5 feet and then 45-degree angles cut out of them as well.
It was just a matter of drilling the holes for the screws and then using premium deck screws (that won't rust) to put everything together.
The grape trellis is very sturdy and will be completely filled with leaves from the two grape vines once they all grow! From what I have read, the grapes will produce about 30-45 pounds of grapes on each plant after a few years after maturity. The vines I purchased are three years old already and will begin fruting the first year, but there is still a lot of growing they need to do so I don't expect that large of a yield until at least a year afterwards.
The next question I had was – how to make a strawberry pyramid. I chose to use strawberry pyramids for a number of reasons – (1) I don't have to dig the tiller out and till the ground, (2) raised planting schemes allow you to plant more in a smaller area (therefore I am able to plant 50 in the same space as I could have only planted about 25), and (3) having these beds will make the landscaping look nicer and appealing instead of having rows of strawberries in the front yard.
The strawberry pyramids I made are 4'x4' in size and they will each hold about 22 – 24 strawberry plants. Here are the materials I used for each:
- 3 – 1"x4"x10'
- 1 – 2"x2"x10'
- 1 – 2"x2"x8'
I then cut the proper items as follows:
- Using 1 1"x4"x10' board, I cut two 4-foot pieces and two 10-inch pieces
- Using 1 1"x4"x10' board, I cut another two 4-foot pieces and two 10-inch pieces
- Using 1 1"x4"x10' board, I cut the remainting four 28-inch pieces
- Using 1 2"x2"x10' board, I cut 4 12-inch pieces and 4 16-inch pieces
- Using 1 2"x2"x8' board, I cut 4 22-inch pieces
What are all these pieces used for? Well, the outer square is made up of the 4-foot cut boards (4 of them) and they are held in place by the 22-inch stakes made out of 2"x2" boards. The reason these are larger is because I want to put bird netting over the whole thing, so these will support the bird netting. The middle square is made up of the 28-inch cut boards (4 of them) and they are held in place by the 12-inch stakes made out of the 2"x2" boards. Lastly, the inner square is made up of the 10-inch cut boards (4 of them) and the 16-inch stakes made ouf of the 2"x2" boards. The stakes were cut at double 45-degree angles (45-degrees from both sides) to make a point to make it easier for driving the stakes into the ground 3-4 inches.
For the outside square, measure up 4-inches from the bottom of the 4 – 22-inch stakes and make a line. This line is where the bottom of the 1"x4" board will be placed (that means you will have 4" of area below the 1×4 board for driving it into the ground). Do this for all four 22-inch stakes and screw the 4-foot boards on them to make a square.
For the middle square, screw the 4 – 28" boards to the very top of the 12-inch stake. Same with the inner square – screw the 4 – 10" boards to the very top of the 16-inch stakes.
Then, go place them where you want in the yard and put them in the ground! The outter square should have the 1"x4" boards flat with the ground so that there is no space between the ground and the boards. The middle square should have about the boards about 4" higher than the ground, and the inner square should have the boards be 8" higher than the ground – which causes the stepping or pyramid effect. Fill these with dirt and you will see the results like below!