Other search terms:
how to self-pollinate corn
how to self pollinate corn
how to pollinate corn
corn pollination
This is the second posting in my blog on How to Manually Pollinate Corn.
Many gardeners do not have the room necessary to grow corn in blocks for the best pollination. Even then, the natural method of spreading pollen onto the silks of corn isn't all that great – and meany times leaves the outer perimter of corn more to be desired.
In my garden, I have corn in three different beds. One area has corn in rows of about 13 long and with 3 rows. Another area only has one row of about 13 – and in the last one, about 15 rows long by 5 rows (two rows of these are in containers like five-gallon buckets).
In order to ensure that all the corn comes up well, it is best to manually pollinate corn. I did this last year with the Sugar Dots corn and had great success – and I am doing the same this year. Actually, I worked today on pollinating five stalks (since that is all that is ready at this point).
I have pictures in this entry to show the steps on how to do so. Sure, it takes a little more time, but I believe it is worth the time to ensure every stalk supplies one – or even two very good ears of corn.
Step 1 – Cut off the tassels from the stalks
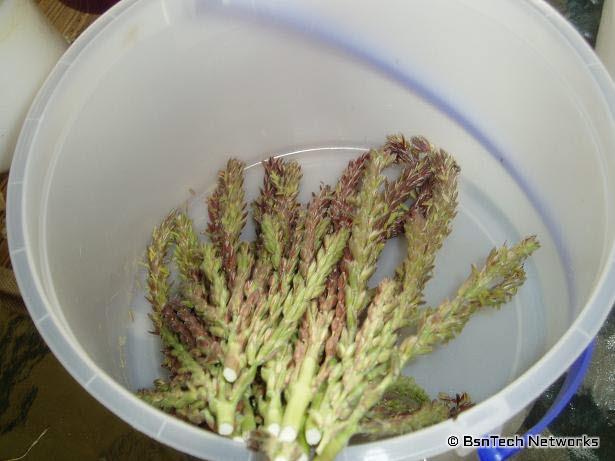
Many folks just shake the tassels and expect the pollen to go down to the silks. I don't go with this method – especially on windy days. So, I actually cut off the tassels and then place them in a gallon ice-cream bucket. Ocassionally throughout the day, I will shake the tassels in this container to release the pollen
Note – when you cut off the tassels, make sure that at some of the flower-looking buds that hold the pollen should already be opened. This ensures that the tassels are beginning to mature and pollen is being produced. Don't wait too long to where most of them are open, though.
Here is a picture showing about five tassels in the ice-cream bucket:
Step 2 – Strain the pollen from the bucket (or where the cut-off tassels are located)
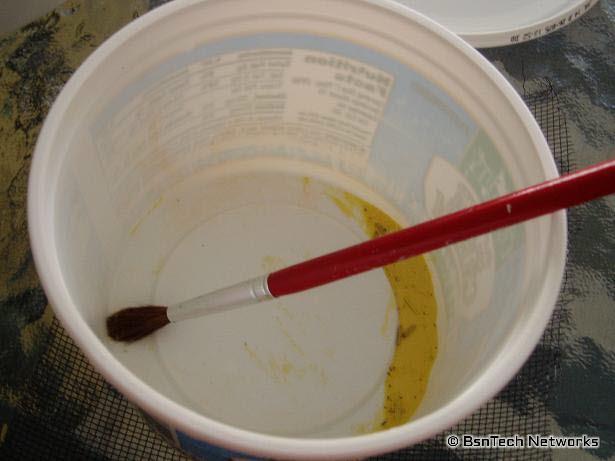
I use a smaller sour cream bucket with a very fine mesh over the top (basically I use a mesh that was used to make a screened-in patio). I take the tassels and put them in another ice cream bucket – then empty the original ice cream bucket through the mesh into the sour cream container. This will then allow the pollen to fall through and keep the buds out of the pollen.
Here shows sour cream container with a paint brush and a good amount of pollen (this was only from five tassels!).
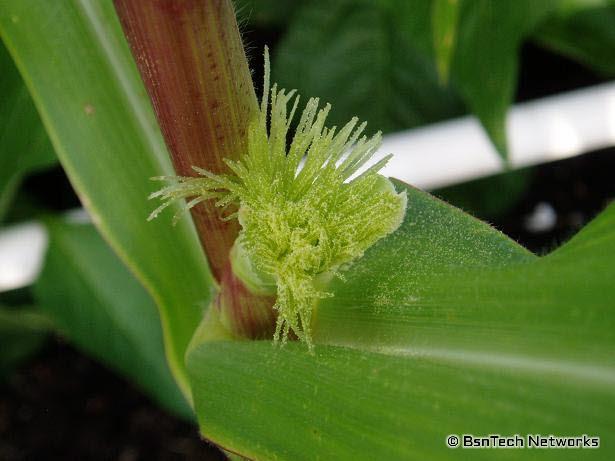
Step 3 – Cut down the length of the silks so they are easier to pollinate.
This step isn't necessary, but it makes pollinating the corn extremely easy. All of the silks go every which-way but if they are all cut to on length close to the leaves, they all "glob" together and ensure that the pollinating is even and uses as little pollen as possible (if you don't have a lot of pollen in the first place!).
Step 4 – Use a paint brush to pick up pollen and brush over the silks
Very easy to do – especially if you went through Step 3 and cut the silks to all the same length. Gently put the paint brush into the container with pollen and dab it on the silks. Make sure you are thorough and get on all sides of the silks and ensure each one has pollen.
Here is a photo of the silks covered with pollen and also cut back to one size.
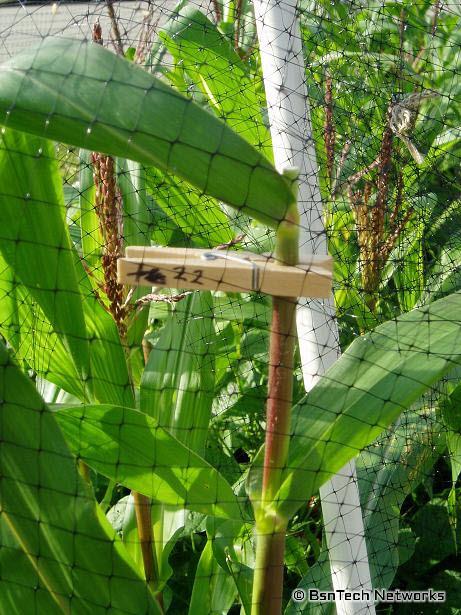
Step 4 (Optional) – Mark the stalks of corn when you pollinated them
I mark the corn with clothes pins and use a sharpie to put the date on them. Why do I do this? It is noted that approximately 21 days after the silks emerge, the corn is ready to be harvested. So, quickly at a glance when I go out to the garden to see what needs harvested, I can easily look at the clothes pins and see which ears ned to be pulled.
As an example – today only five of the corn stalks had a good amount of silks on them and were pollinated. So I put the date of "22" on the clothes pin. Tomorrow I may have more that need to be pollinated, so that will be "23" and so on. Not all the corn will be ready for pollination at the same time
Here is a photo showing the clothes pin with the date.
And that is how to manually pollinate corn!
As a side note, I learned something from last year. Pollen will only last a day or two after being shaken. This is mostly due to humidity getting to the pollen and making it clump together. At this point, the pollen isn't good. So, ensure that you have a good supply of pollen. I recommend only clipping off the tassels of plants that have a decent amount of silks showing on them so you can shake the pollen and use it the same day. With the method of cutting the tassels off and shaking them, one tassel will easily cover 5+ stalks of corn.
Another side note – you also need to check on the corn you pollinated for a few days. If you notice that more silks have emerged (easy to tell if you have cut all of them to the same length as the new silks will be longer and stand out), you need to ensure to pollinate the new strands of silk and cut those back as well. Otherwise, you won't get a kernel in that spot of the cobb.
Also note that many times, you will get two ears of corn per stalk. While you pollinate the first set of silks, you will need to go back and pollinate the second set when they emerge. Again, I will do the same exact procedure above – and also not on the clothes pin the second date that the second ear had silk emerging and was pollinated.