Boy I have been very busy lately! So busy I've taken several pictures throughout the week that I am just getting a chance to post now.
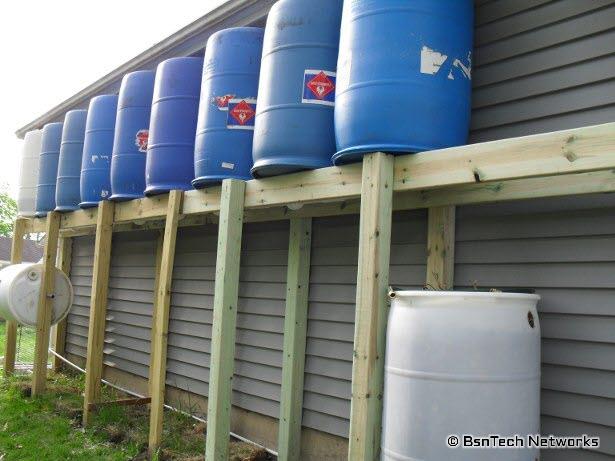
Why so busy? Well, the weekend was fully consumed with – building onto the rain barrel system. I think at this point, I have gone from crazy to fully insane. As if six 55-gallon drums that hold 330 gallons of water wasn't enough, I'm going to expand it to DOUBLE this.
After I put up six, I was fully content and thought I was done. Well, we have had almost drought-like conditions. We haven't had any rain for about two weeks now. It is forecast that we will FINALLY get some rain (20% chance) on Wednesday or (60% chance) on Friday.
I have used up almost all of the water in my current barrels. They were completely full – and now I have less than 50 gallons of water left. I have been starting to use the water sparingly. When watering the front garden, I've only let it run for about three minutes total – which isn't bad since the front garden is only about 50% full. For the back gardens, I've only let it run about five minutes.
Friday evening I went to get the lumber and equipment needed to make the platform. This consisted of two 2×6 boards that were 12 feet in length, six 4×4 posts that were eight feet in length, and a total of 12 1/2-inch by six inches long of lag screws to hold everything together. I made a video on YouTube going over the construction of the platform if you'd like to try it yourself.
After getting home Friday evening, I got four of the six holes dug for the posts. Saturday morning I woke up early and got the other two holes dug – then took off to the place to get the barrels.
Unfortunately, after I got there, they told me that they will not be getting any more barrels in – until winter! They said the windshield wiper fluid that comes in the 55 gallon drums is only used during the winter time. But, they had three barrels – so I hade two trips to pick them up.
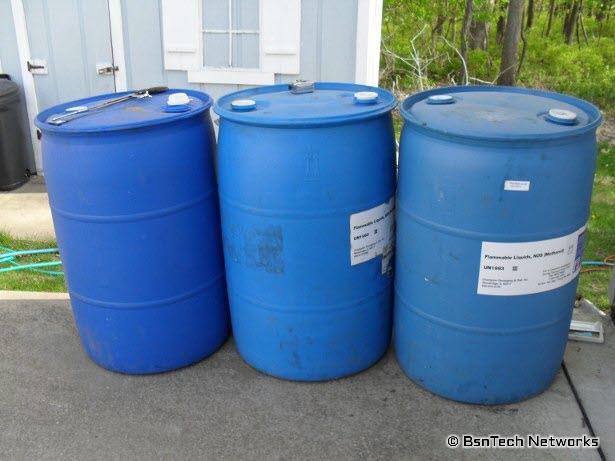
Well, three is better than none – it will add 33% more capacity to my system by adding 160 gallons of additional capacity (total of 490 gallons now).
I then started putting up the platform the rest of the day – and it took me all day to do it. When putting up the platform, I dug the holes for the posts at least two feet deep to get below the frost line. I then put the posts in the holes and drilled a couple of holes in the 2×6 board. After doing this, I had to hold up the 2×6 board to one of the posts to get the height right to match the current barrel system I had. I then marked where to drill a hole in the post, drilled the hole, and then put in one screw to hold it in place.
After doing that, I then went to the post on the end and held up the 2×6 across that post. I had the level on the 2×6 and ensured the board was level – and marked the spot on the post where the level mark was. I also marked a couple of spots on the 2×6 for making two more holes for the screws to go in. Drilled the holes and then drilled one hole in that post, put a screw in, and the 2×6 was fully level and horizontal.
After doing this, I filled those two post holes in with dirt (trying to go as inexpensive as I can – concrete would add another $30 – $40 to the project). Then I went to the middle post, filled it in with dirt, and then drilled the holes in the 2×6 and the post. So, one side of the platform was done – and then I repeated the whole procedure for putting up the second side of the platform.
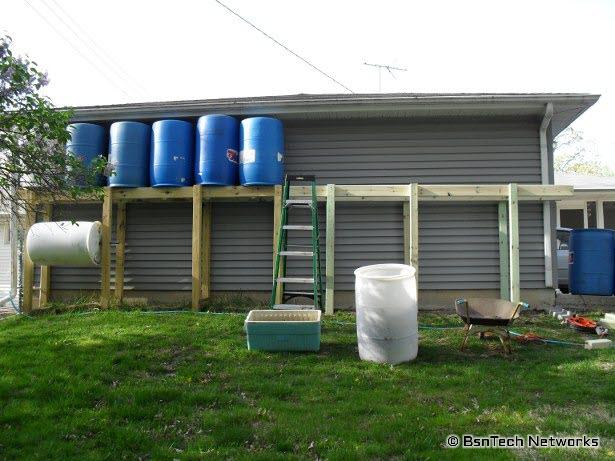
Would you look at that – you can see the new construction above (where the barrels are not on top). It now spans the entire 24-foot garage – and will allow me to have capacity for 12 barrels that will hold 660 gallons of water. Another positive of building it out completely along the garage is now I can make use of the other downspout on the side. Right now I just tried to seal the downspout in the gutter with duct tape – but I don't suspect that is going to hold for much longer.
Sunday morning it was time to work on the three new rain barrels and get them put together. I also highlighted how I do this process through another YouTube video that you can watch as well .
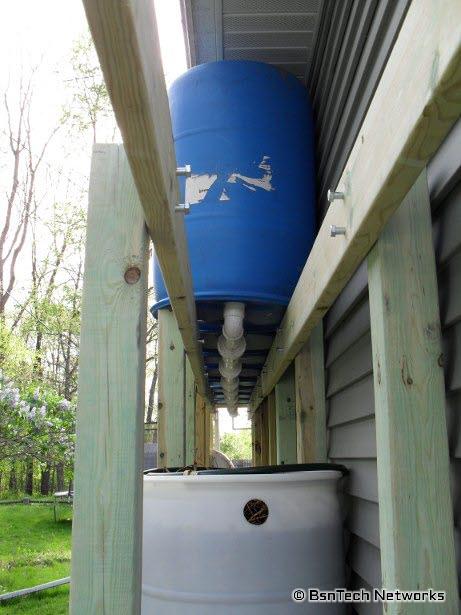
While I don't have any pictures of the construction of those barrels, it is fairly straight-forward. At the top of the barrels, there are two plastic screw holes. One of the screw holes has very course threads and the other has very fine threads. You will ensure that the coarse-threaded hole is very tight (you don't want water to get out through this hole since it will be at the bottom). The fine-threaded hole should have the cap removed. With the barrels I get, there is a rubber O-ring in this cap – which I remove. I then use a 2" male-threaded PVC adapter, put the O-ring over this adapter, and screw it into the hole – again, very tight so water cannot escape.
Then cut a very small piece of 2" PVC pipe (probably 2 – 2.25 inches). This will slip into that 2" male-threaded adapter. You then either have a 2" PVC 90-degree elbow (two barrels need to have a 90-degree elbow) or a 2" PVC T-connector (all barrels between the two end barrels need a T-connector). Use some PVC cement and glue the small piece of PVC pipe you cut into the male-threaded adapter, and then cement on the T-connector (or 90-degree angle) right on top. Make sure that it is a very good fit and turn the pieces while putting them together to make a better adherence.
After this, you then need to cut another 2" PVC pipe to connect the barrels together. I would highly recommend getting a PVC slip union – which is a place where a male-threaded and a female-threaded piece come together with a rubber O-ring. This will allow you to disconnect the barrels individually. Use the PVC cement again and glue all of these items together.
Lastly, you need to turn the barrel over (basically the bottom of the barrel) and drill a hole. This hole needs to be drilled out so as the water comes in from the bottom (location where you just glued all the PVC stuff together), the air can escape through the top. Use a fine mesh and some silicone adhesive over the hole to keep the mosquitoes out.
Thats how to do it. Here's a few more pictures of the setup completed.
In other news, I've been doing more work around the garden – on top of everything else.
I was very disappointed with the germination rate of the brand new Burpee Super Sugar Snap peas. Only nine of them came up out of 99 that were planted. The Dwarf Gray Sugar peas – which are a year old – faired much better. However, I sun-scorched them and only about 20 of the 62 went into the garden. I then direct-sowed the rest of the Dwarf Gray Sugar the rest of the way in the garden alongside the house.
I then used the Sugarsnap peas I got from FedCo Seeds to seed behind the garage. I really hope those sprout because I'm counting on them. It is a different variety and from a different seed company – so hopefully that will make the difference.

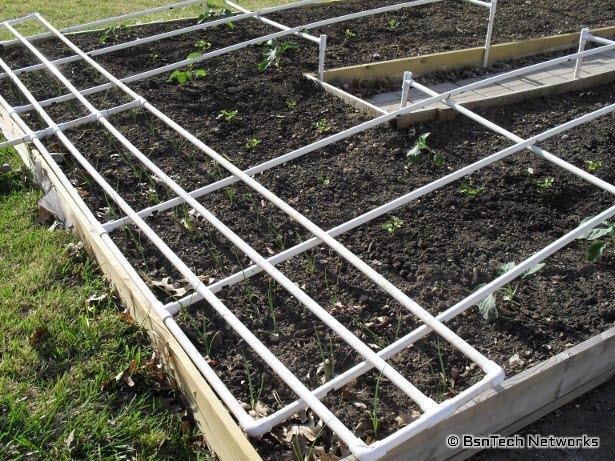
Over the weekend, I also planted the Ventura Celery out into the front garden. The front garden is starting to fill up! The peppers, corn and pole beans are all that is left to be planted in the front garden. The broccoli is doing very well – although I have one runt that hasn't grown at all since being put in the front. It was like this as a seedling and I should have thrown it out, but I had exactly eight broccoli – which is what I needed for the garden.
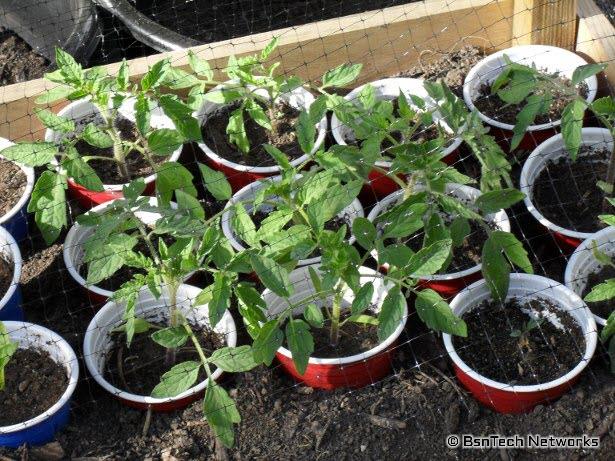
The tomatoes are growing very well! I don't know if it is the rain water that I'm using to water them, or if it is the compost tea solution that I've also just began using. The tomatoes were pretty good sized with just using rain water – but I think the compost tea has helped a little bit.
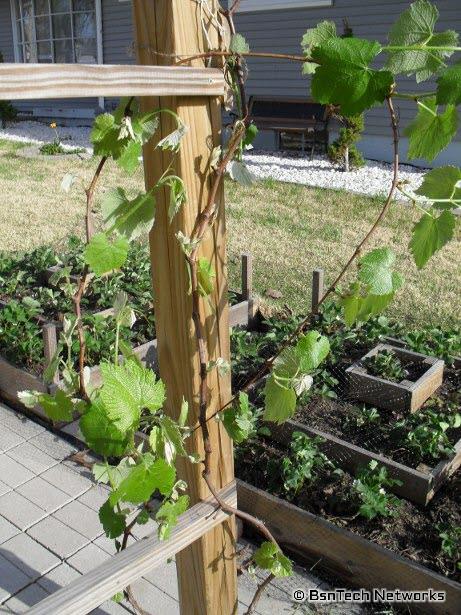
Lastly, I took a picture of the grape vines in the front yard – and a good thing I did. I woke up Sunday morning and saw that one of the vines was completely stripped. The deer got to it before I could put the netting around the grape arbor. I was sorely disappointed after seeing the deer got to them because there were several grape clusters on the new growth. Then Monday morning, I woke up and found the other grape vine stripped as well. At least they didn't get the growth on top of the arbor – which is what I'm more concerned about.
So today I just got in from putting the netting up around the arbor to hopefully save any new growth the grapes put on.