If you would like to have your e-mail on your iPhone or iPad, you’ve come to the right place. Below are the instructions for setting up the e-mail account.
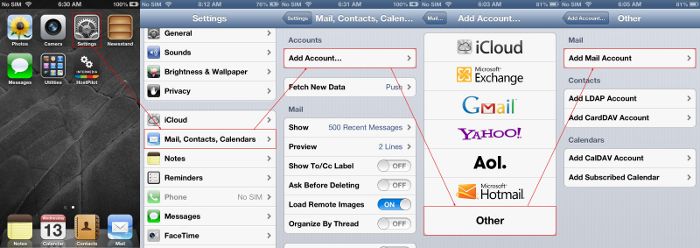
Step 1 – Tap your Settings icon (the gear icon)
Step 2 – Tap on Apps
Step 3 – Tap on Mail
Step 4 – Tap “Add Account”
Step 5 – Tap “Mail Account”
Step 6 – You will be asked what kind of account this is. Choose “Other”
Step 7 – Now, you may need to tap “Add Mail Account”
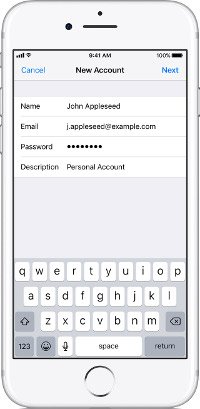
Step 6 – You will now enter your name, e-mail address, password, and a description of the e-mail account. Then hit Next at the top right side of your screen.
Step 7 – Now, choose either the “POP” or “IMAP” option at the top of the screen (if not already selected).
IMPORTANT: If you choose IMAP, all of your email will be stored on the server until you delete it. If you have a basic email account and not an upgraded account, the mailbox will fill up quickly and prevent new messages from coming in until you are under your mailbox limit.
You then need to enter the below information under the “Incoming Mail Server”:
Host Name: mirror1.bsntech.com
Username: Your full e-mail address
Password: Enter your e-mail address password
Step 8 – Enter the below information under the “Outgoing Mail Server” section:
Host Name: mirror1.bsntech.com
Username: Your full e-mail address
Password: Enter your e-mail address password
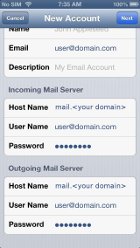
Step 9 – Now tap “Save” at the upper right corner of your screen. The phone should then check the settings and ensure a connection can be made. If not, you may need to enter these Incoming Mail Server settings under the “Advanced” button:
Use SSL: ON
Authentication: Password
If you chose POP in the prior step, the Incoming Mail Server Port: 995
If you chose IMAP in the prior step, the Incoming Mail Server Port: 993
You may also need to enter these Outgoing Mail Server settings under the “SMTP” button:
Use SSL: ON
Authentication: Password
Outgoing Mail Server Port: 587
You are all done!