The past week has been quite rainy. Since the night temperatures have only been getting down to 36 degrees or higher, I decided to hook the rain barrel system up.
I went to work on Thursday and it started raining mid-day. By the time I got home, I checked on the barrels and they were already completely full! That was approximately 220 gallons of water already stored and ready for use. The funny thing is – we only had about a quarter of an inch of rain during that time period – and I managed to get 220 gallons from that off of a 24 x 24 garage roof (about 576 square feet).
Friday I went out to harvest some of that rain water to fill up some gallon jugs. I've been using rain water to water the seedlings inside instead of using tap water from the house. When I went out there, I decided to test the water timers to see how well they do in a low pressure situation. While I don't know how much water pressure I have, there is a decent amount since the barrels are all hooked up with 2" PVC pipe about five feet in the air.
Without the water timers hooked up, I was able to fill a gallon milk jug in about 10 seconds or less – pretty amazing. That is coming out of a 1/2-inch PVC pipe.
Then I hooked each of the timers up. I don't have statistics right now for how quickly they would fill up a gallon jug, but I will do that at another time.
The first one I bought is a timer that does everything for you. You set the time and then there are several options. It is a Nelson automatic water timer. You can set it to water everyday for 15, 30, or 60 minutes. You can also set it to water every other day for 15, 30, or 60 minutes. Lastly, it then allows you to twice every day for 15, 30, or 60 minutes. I've always used the every other day for 15 minute setting.
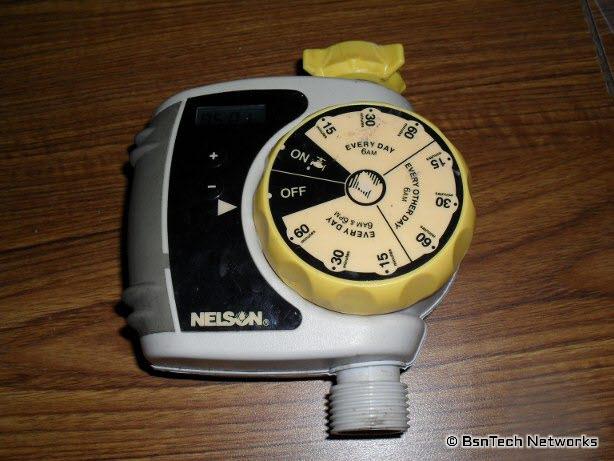
I hooked the timer to the male threaded PVC adapter (where I can hook a hose too) and turned this thing to the On position. Within a few seconds, water started trickling out – not very good. This timer requires a decent amount of pressure to get water through. I estimate that the throughput on the timer was about 1/4 what the throughput was without the timer hooked up.
The next water timer is a manual water timer – a Gilmour timer. You have to set this one yourself whenever you want to water – but it will just automatically turn off when the time is up. You can set it anywhere from just a few minutes to 120 minutes.
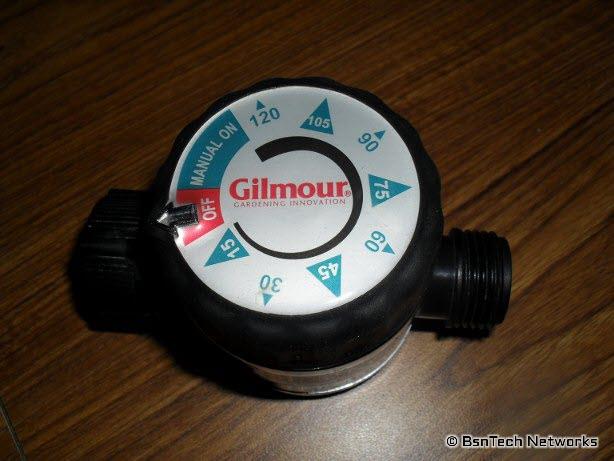
I hooked this one to the PVC adapter and turned this one to the Manual On position. Same thing as the Nelson timer. The flow was maybe 1/4 of the flow that the 1/2-inch PVC pipe would push out without obstructions.
So, I'm not sure what to do yet about the watering situation with the garden. I have heard of low pressure water timers, but I'm reluctant to buy one online and find out that it has the same problem.
What I don't understand about these timers is this – why can't someone just invent a timer that turns a ball valve to open the flow of water? It seems all of these timers have obstructions or something that cause them to seriously slow down the water flow – but why not make a timer that allows a full-flow of water to go through? Standard PVC ball valves work just fine – which is what I use on the spigot connection to turn on and off the water flow.
Anyways – moving on.
So today I got some motivation and decided that it was time to upgrade the water system since it fills quickly. I figured that when I first made the system I would upgrade in the future. I want to ensure that I have enough water stored if we have a few weeks without much rain.
I made a trip to the place where I get the barrels and picked two up. I got home and drilled a hole in the bottom (well, it really will be the top of the barrel – but the opposite side of where the two bung holes are). I then put some patio screening over it and used some super glue to put it in place. This will allow air pressure to leave the barrels as they fill up – and the screening will keep the mosquitoes out.
I then had to go and get two 2" PVC unions, two 2" PVC T connectors, two 2" PVC male threaded connectors, and another section of 5-feet of 2" PVC pipe. The PVC unions were about $7.68 each, the T connectors $2.09 each, and the male threaded connectors $1.02 each. The 5-feet of PVC pipe was then $3.17 for it. So, everything I needed to make two more rain barrels for $24.75. Not bad – basically $12.38 per rain barrel. However, I had another dilemma – since these are in the air, I needed building material. Woops – there was another $20. I had to get two 12-foot length 2×6 treated boards and two 8-foot 2×4 treated boards. The 2×4 were the posts and the 12-foot length of 2×6 was used so all the rain barrels will sit on them. Previously I had a 8-foot length 2×8 – but a 2×8 was a bit overengineered for this. Each barrel takes up about two feet of space – so plan accordingly. I then have the vertical posts placed four feet away from each other.
Just my luck – it started raining during the process. I got the two holes dug for the posts and started drilling the holes in the 2×6 boards to put the lug screws through. It got muddy quickly since this is build on a hill beside the garage. But, I managed to get it all done.
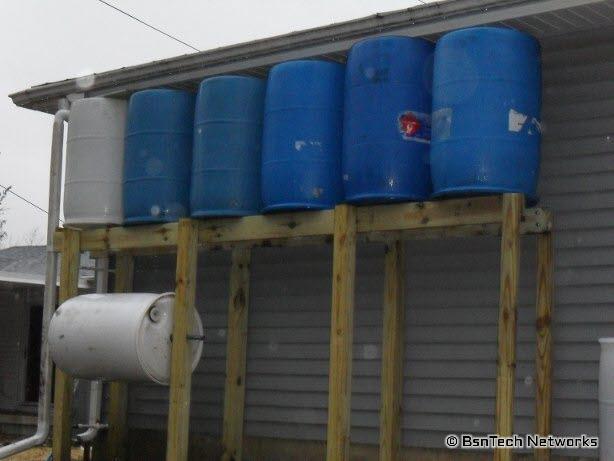
So, now it is an approximately 330 gallon rain barrel system – up from the 220 gallon rain barrel system. I think I'm satisfied with this and I'm done building it.
While there is the advantage of additional storage capacity, I also tweaked the downspout a bit. Previously, I had a 90-degree gutter elbow and then a straight piece of downspout attached to it that was about six inches long. Well, where the elbow and the straight piece come together, there was a leak and it made ruts in the ground. So, I moved the whole rain barrel system over closer to the downspout by about eight inches – so I no longer needed the straight piece; the 90-degree elbow attaches directly to the hole in the gutters and diverts it right into the barrel now.
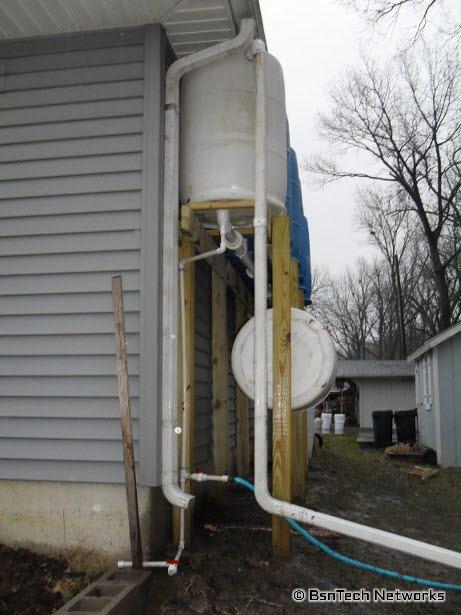
In the picture below, you can see on the upper left side of the white rain barrel, there is a 90-degree elbow that was cut down to size connected to the gutters.
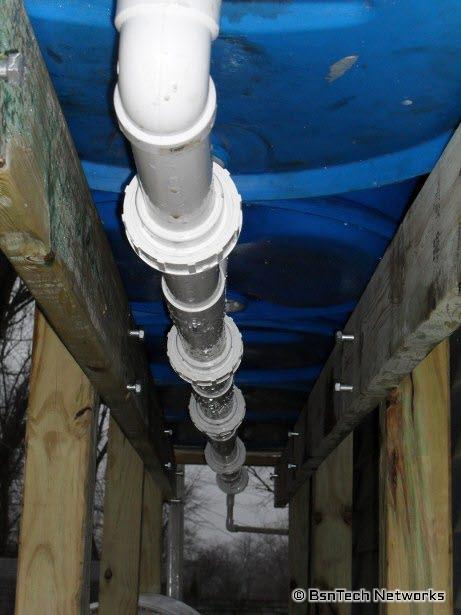
Below is the under side of all the barrels. Again, they are all hooked in series using 2" PVC pipe with a PVC union between them so I can disconnect the barrels individually.
And lastly, you can see the main downspout attached to the garage. It is not attached to the gutters though (hard to tell in the picture below). Then there is another downspout coming from the top of the white barrel – this is the overflow downspout. When all the barrels get full, water will overflow into this and go down this to the ground.
March 14 Update – More Concrete Timer Trials
This afternoon I got out and did some better testing of the water timers.
After I got the new system hooked up, the barrels collected just about 28 gallons of water amongst all six of them. On the white barrel, there are lines every 10 gallons of capacity. Of course, since the barrels turned upside down, the numbers also go backwards – so 50 gallons shows at the bottom. Anyways, the white barrel was filled up to almost 3/4 to the line of the 50 gallon mark. Also note that the white barrel is also approximately two inches higher than the rest of the barrels – so I estimate that all five barrels have 4.75 gallons of water and the white barrel has about 4 gallons of water (total of 27.75 gallons).
Since the barrels are not completely full, this means there will be less pressure as well. When the barrels get full, I will take measurements again.
Using just the ball valve to open the flow of water to a gallon jug, the time it took to fill was just under 8 seconds. This yields about 7.5 gallons per minute. While I can't be certain as of yet, I don't expect this to decrease with the barrels completely filled – maybe by one second at the most. The flow was fully unobstructed so this is what the 1/2-inch PVC pipe is capable of.
I then dumped the gallon of water back into the top of the barrel – just to ensure that the numbers would be fully the same.
Next up – the Gilmour water time. I was very unimpressed and know that this clearly will not work in a situation where the barrels are at this level. The Gilmour manual water timer took 68 seconds to fill a gallon jug – that is 8.5 times slower than just using the unobstructed ball valve on the PVC pipe. Therefore, the Gilmour manual water timer puts out about 0.88 gallons per minute.
Water was them dumped back into the top of the barrel.
Lastly, the Nelson automatic water timer. The Nelson water timer was quicker than the Gilmour – with it taking 40 seconds to fill up the gallon jug. The Nelson timer effectively worked at 1.5 gallons per minute in a low pressure situation. Therefore, my original estimate of the timer output of 1/4 compared to the unobstructed flow was almost correct – the actual output was 5 times slower, or 1/5 the output of the unobstructed flow.
The Nelson water timer may work fine for the garden – but that means I need to buy three more timers! I need four total – because I'll have behind the garage, next to the house, and two 4 x 20 areas up front – and they will all have to be setup so that one waters an area and shuts off – then the next one would water the area and shut off, etc. With the timer being on for 15 minutes, this would put out 22.5 gallons of water for each water space – multiplied by four watering spaces is 90 gallons of water. Wow – good thing I upgraded the system to 330 gallons – because it would only take 3 2/3 waterings to fully drain the barrels! That means I have a capacity of just about one week of water if I water every other day – provided there is no rainfall in the week.